


As many of the WARC members will know – because I’ve bored you with talks on the subject – I have had great fun for several years writing Vector Network Analyser (VNA) software for the most excellent N2PK VNA by Paul Kiciak. Most people will have heard the talk on VNAs – if sufficient have not, I’m happy to give another J.
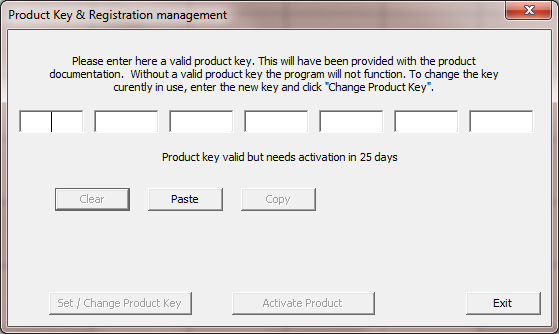
Free for amateur use, there are some commercial applications supported by Ivan Makarov VE3IVM. In order to protect the investment we’ve made, I agreed to implement some product key protection. As a result, when you first run the program you see this:
So, how does it work? Well, not as described here. Not exactly anyway – it’s very similar to this though. I’m not going to say exactly how I implemented it.
In this article, I’ll cover the design, cryptography and implementation.
Principles
What is a product key? It’s a string of data that the program will accept as a valid key in order for the program to operate. However it must be constructed in such a way that someone cannot guess a valid key. Easy – make it structured in such a way that a randomly chosen string will not work. That means that the chance of any random string being tried must be unlikely to work.
One way might be to use a cryptographic hash of a short message. Problem though. If anyone reverse engineers the program and discovers the structure all is lost. So we need something more sophisticated.
How about using an asymmetric cipher? Public key cryptosystems have been the subject of talks at the Warrington club before – and specifically the RSA cryptosystem. This relies on the fact that factorisation of a large integer that is the product of two large primes is computationally expensive. This would work.
Bit of a problem though. Using something like 1024 bit RSA would mean a product key of 128 bytes – way too long.
So, that won’t work. I think we’ve not covered it in a lecture at the club yet, but a better choice would be to use Elliptic Curve cryptography. Key lengths are much shorter; for example a 256 bit EC key has roughly the same strength as 3000 bit RSA. A 160 bit curve gives roughly the same security as 1024 bit RSA. Even 160 bits is a bit big but we can reasonably choose a smaller curve given the level of security that we seek. There are many good tutorials on the internet on ECC. Wiki is good and here is a good clear tutorial.
There was quite a good write-up of product keys on the internet that I found that taught me a lot, but it had a fundamental problem – it used ECIES (er, don’t worry, we’ll explain this a bit later). You can find the write-up here.
My implementation? I used a method called ECDSA but with a few twists. Those twists I do not present here.
Ok, there are limits. You can always crack the program. It needs to protect itself as far as it can.
What is an elliptic curve?
Remember you maths?
![]()
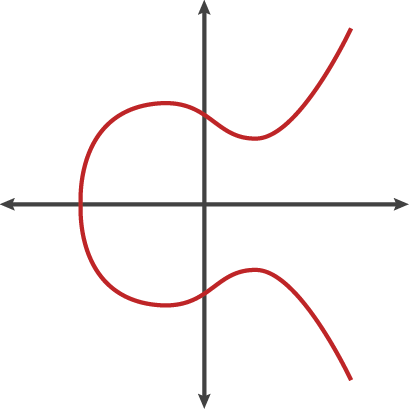
That’s the equation of one. There are other forms but we’ll use this one.
For certain values of a and b, you might get a curve like this if you plotted it
You can take two points on this curve and construct a method for “adding” points like this:
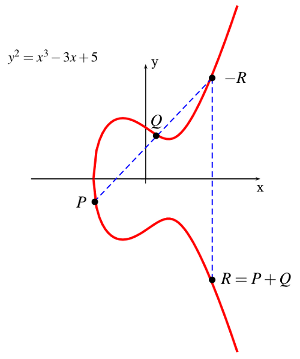
Adding point P and Q gives point R.
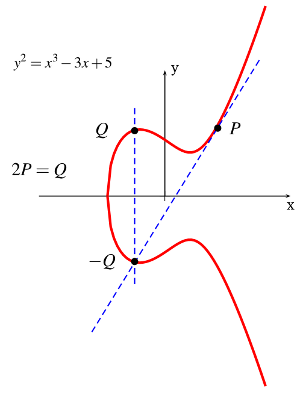
If you add a point to itself (Q = P+P, in other words Q=2P) that’s the equivalent of “doubling” the point. 2P+P is 3P and so on; we therefore have the notion of “point multiplication”.
In RSA we use “square and multiply” to perform exponentiation. In ECC we use “double and add” to perform point multiplication.
So how do we do this in cryptography?
Well, we use a variant where we have integer points on the curve rather than using real numbers, and we construct it in such a way that the points we use form a finite field. That’s as far as we’ll go for now on the number theory – oh and to make the maths work we also need to define the “point at infinity”.
We’ll use a prime field here but there are other forms. This means that all calculations are performed modulo a prime p.
So what does a point look like? Well, it has an X and a Y coordinate. It is a point on a curve.
And the formula for point addition? A bit messy.
If you have two points X1 and X2 we can add them together to form a point X3 as follows, where x1,y1 are the x and y coordinates of point X1 etc.
Notice the convention? Points have x and y coordinates and are represented in upper case.
So, we add X1 and X2 as follows (this is the case when the points have different x coordinates – there is a different rule for the other case).
First calculate λ as follows
![]()
Then calculate
![]()
![]()
Fortunately we don’t have to muck about with all this as there are libraries freely available to do it.
So we have a curve. It has values a and b (remember that equation above?). It has a prime number p. It also has a couple of other numbers. One is called the “base point” or generator. The other is the “order of the base point”.
What are these?
The base point (G) is a point on the curve. If you add it to itself, you get another point on the curve. That is 2G. Add the basepoint again. 3G. Keep going. Eventually you get back to where you started. That should happen after a lot of operations; ideally, for a 160 bit curve, it should be pretty close to after 2160 operations. How many times exactly? That’s the “order” of the base point.
So we have our maths. We have a curve. We can do basic mathematical operations because they form a finite field.
Digital Signatures
The product keys I implemented are a form of digital signature known as the Elliptic Curve Digital Signature Algorithm (EC-DSA).
To use it, first generate a private key. This is just a randomly chosen integer less than the order of the basepoint (let’s call it d). The public key is a point on the curve (P) that is generated by multiplying the base point by d; in other words P = d*G. Note the convention again; P and G are points, d is an integer. ‘*’ is point multiplication.
Now, suppose you want to sign a message m.
Follow these steps:
- Calculate a hash of the message e = hash(m) and truncate if needed
- Select a random number k less than the order of the basepoint
- Calculate the point on the curve (x1, y1) = k * G
- Calculate r = x1 mod p. If r is zero, go back to step 2
- Calculate s = k-1(e + rd) mod p. If s is zero, go back to step 2
The signature is the pair (r,s). This is what I do to create a product key.
The VNA program does this to verify a signature (P is the public key that corresponds to d):
- Check that r and s are integers between 1 and the order of the basepoint
- Calculate e = hash(m) and truncate if needed
- Calculate w = s-1 mod p
- Calculate u1 = ew mod p and u2 = rw mod p
- Calculate the curve point (x1,y1) = u1 * G + u2 * P
- The signature is valid if r = x1 mod p
Don’t need to code this either as again there are libraries to do it. What I did need to do however was this:
- Make a program to generate EC keys and using those keys product keys
- Modify the VNA program to require product keys
- Modify the VNA program to generate activation data and require an activation key
- Make a program to generate activation keys
And because I need to be able to generate activation keys for people on demand
- Port the activation key program to my phone as an android app
So what are my product keys?
Take a short message m. That message is a couple of bytes that define the permissions granted by the product key – for example it might be to permit the program to be used for a period of time, or for a limited range of features. The program is going to interpret this message. The message is signed using EC-DSA. The product key is just the concatenation of m,r,s.
How does this differ from the ECIES mentioned earlier?
ECIES is an encryption program. Given a public key P, I can create a message that only the person that knows the private key d can read. If you used this for a product key, the private key d would need to be known by the VNA program – and the program is the thing that you distribute. Reverse engineer it and all is lost – the adversary knows the secret.
ECDSA is the other way round. To sign a message you use the private key d. The program that interprets the signature only needs to know the public key P.
Is that all there is to it?
Well, no.
Here is one of my product keys.
58BWK-43Y4Y-YK8SI-YK5EI-EA8V6-T4NIR-KBR64
Here is another
NB4KQ-FQB8J-PR5D3-XNSVW-C7AFU-2T48N-QKQER
These are signatures of the same message. It’s an evaluation key by the way, so won’t be of much use. So if the message is the same, why do the first few characters differ? That’s because amongst other things there is an additional layer of obfuscation added. It has been transformed by a symmetric cipher. This is just for the hell of it. An additional layer to make the hacker’s job a bit harder.
Incidentally, why does it look like it does? A series of 5 letter groups with alphanumeric characters. It’s called “Base 32” coding and is grouped if 5s to make entry easier. The binary data of the signature, m,r,s, is split into groups of 5 bits and each group of 5 bits is coded as one of 32 characters which comprise the letters in upper case and the numbers. That means 36 possible codings but we only need 32, so 4 are omitted. These are the 4 that may cause confusion 0 vs O for example.
One final twist. The final character is a checksum. It is a simple mechanism to try to avoid typing errors if someone types in the key manually to myVNA.
Is THAT all?
Nope.
So, I supply a product key. What happens if someone publishes one on the internet? Game over as it works for everyone.
So we need a second level. It needs to be associated with a specific instance of a PC. The way this works is as follows. We read a set of identifiers for a PC – its software version, the CPU type, the amount of RAM, the type of hard drive, the MAC address of network interfaces etc. These are hashed together to generate a fingerprint of the PC.
That signature is returned to me as “activation data”. I generate a second “activation key” which is another EC-DSA signature on the concatenation of the product key and the activation data. That is entered into the PC to “activate” it.
The activation data is a constructed data item of several fields.
The first 8 bytes of the activation data is a MAC of the product key. A MAC – Message Authentication Code – is a keyed cryptographic hash of a message. It may be calculated in many different ways – CBC-MAC, CMAC, etc. Pick any suitable method using any reasonable block cipher. There are also hash based algorithms that may be used such as HMAC.
The second 8 bytes is another MAC – this time of the MAC of the product key and the identities of the PC signature components. In hindsight I wish I had reversed the order of the two 8 byte subfields – people tend to look at the start of the activation data and assume that two strings are the same when the second half is totally different.
It is also a pain to have to change the activation key when small changes are made to the hardware, so the program implements a set of weighting factors on the sub-elements. This allows scope for changes to the PC but a complete change – such as copying the data to a different PC – gets caught.
And is that secure?
Not completely. There are ways around this lot, but they take effort. It serves its purpose – it applies a reasonable barrier.
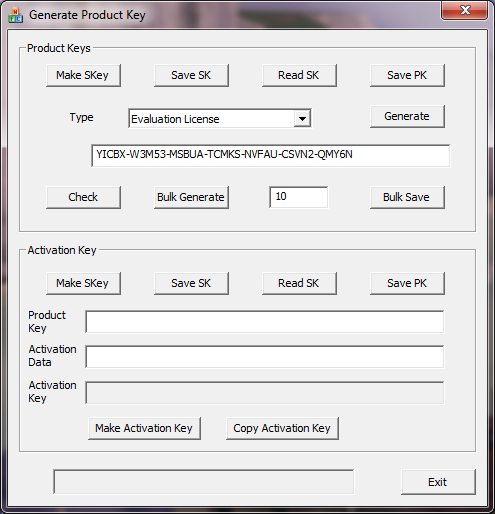
What’s the code look like?
Here is the interface to the program I wrote to generate product and activation keys. It also supports the generation of a private and public key for both signature types. For various types of licence it will generate product keys, and for a given product key and activation data it will generate an activation key.
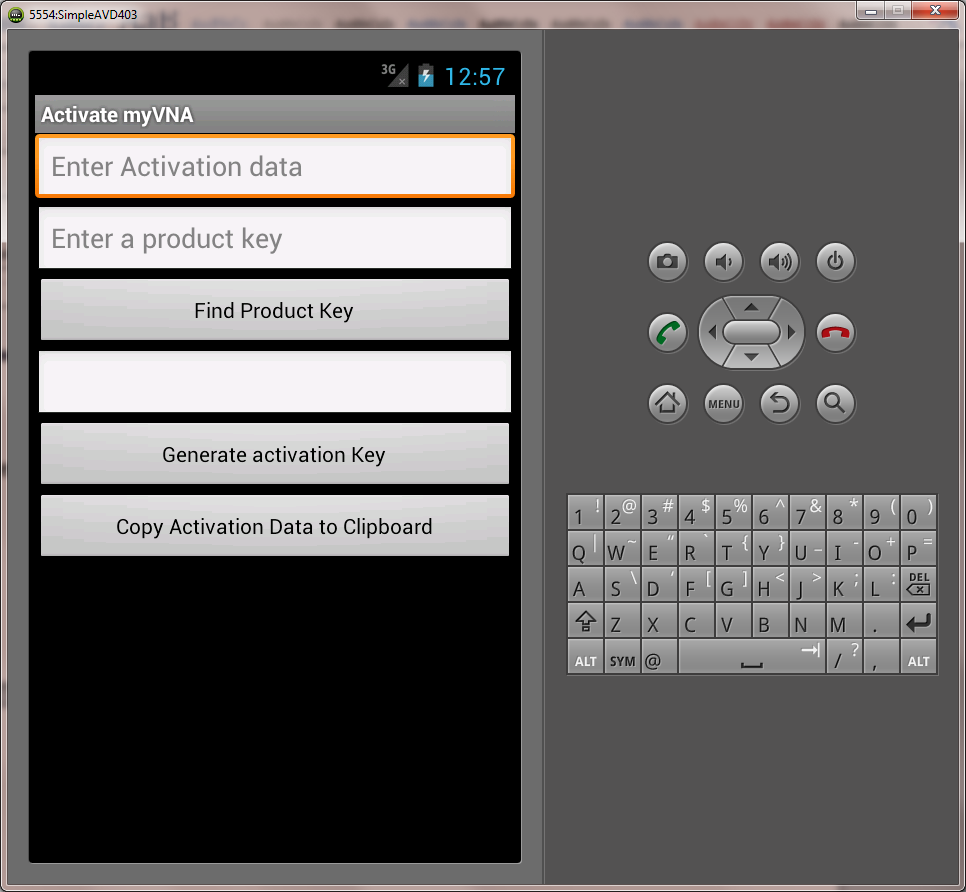
The Android version just generates activation keys.
Most of it is basic windows/android code. The interesting crypto bits look like this….
The library to use is the wonderful crypto++. It provides primitives for ECDSA.
Assuming that p is the prime factor, a and b are the constants for the curve, n is the order of the subgroup and x and y are the coordinates of the base point we define the curve and private & public components thus, where sk is the value of the private key:
CryptoPP::ECP ec( p, a, b );
CryptoPP::ECDSA<CryptoPP::ECP, CryptoPP::SHA1>::PrivateKey PrivateKey;
CryptoPP::ECDSA<CryptoPP::ECP, CryptoPP::SHA1>::PublicKey PublicKey;
// Curve Initialization
PrivateKey.Initialize( ec, CryptoPP::ECP::Point( x, y ), n, sk );
PrivateKey.MakePublicKey( PublicKey );
// create a signer and verifier
CryptoPP::ECDSA<CryptoPP::ECP, CryptoPP::SHA1>::Signer Signer( PrivateKey );
CryptoPP::ECDSA<CryptoPP::ECP, CryptoPP::SHA1>::Verifier Verifier( PublicKey );
The keys are validated thus
if( false == PrivateKey.Validate( rng, 3 ) )
{ throw CString(_T(“Private Key Validation” )); }
if( false == PublicKey.Validate( rng, 3 ) )
{ throw CString(_T(“Public Key Validation” )); }
Signing a message is done using the Signer:
// allocate space for signature
size_t siglen = Signer.MaxSignatureLength();
std::string signature(siglen, 0x00);
// sign
Signer.SignMessage( rng, (byte *)&Message, MessageLen, (byte*)signature.data() );
And so on.