


FreeDV is a program that implements a number of digital modes that may be used on the amateur bands.
You can read about it here https://freedv.org/
It’s based on a very elegant codec called codec2 http://www.rowetel.com/wordpress/?page_id=452 and Wikipedia has a good overview here https://en.wikipedia.org/wiki/Codec_2
FreeDV runs on a PC which works well if you have for example a USB connected rig or two sound cards. ALternatively you can buy a box that implements codec2 called the SM1000
Or you can build your own.
This has been the subject of a club project. The design was created by KK5JY and given the name ‘smalldv’ Information on it is here: http://www.kk5jy.net/smalldv-v1/
https://www.youtube.com/watch?v=Y290NPg0lnM
There are two parts to this project. The first is the hardware, the second the software. KK5JY’s page covers both but to make it easier to assemble, here are more detailed instructions on both. Dave G0BCU worked on the hardware, Dave G8KBB on the software.
The hardware
So first the hardware.
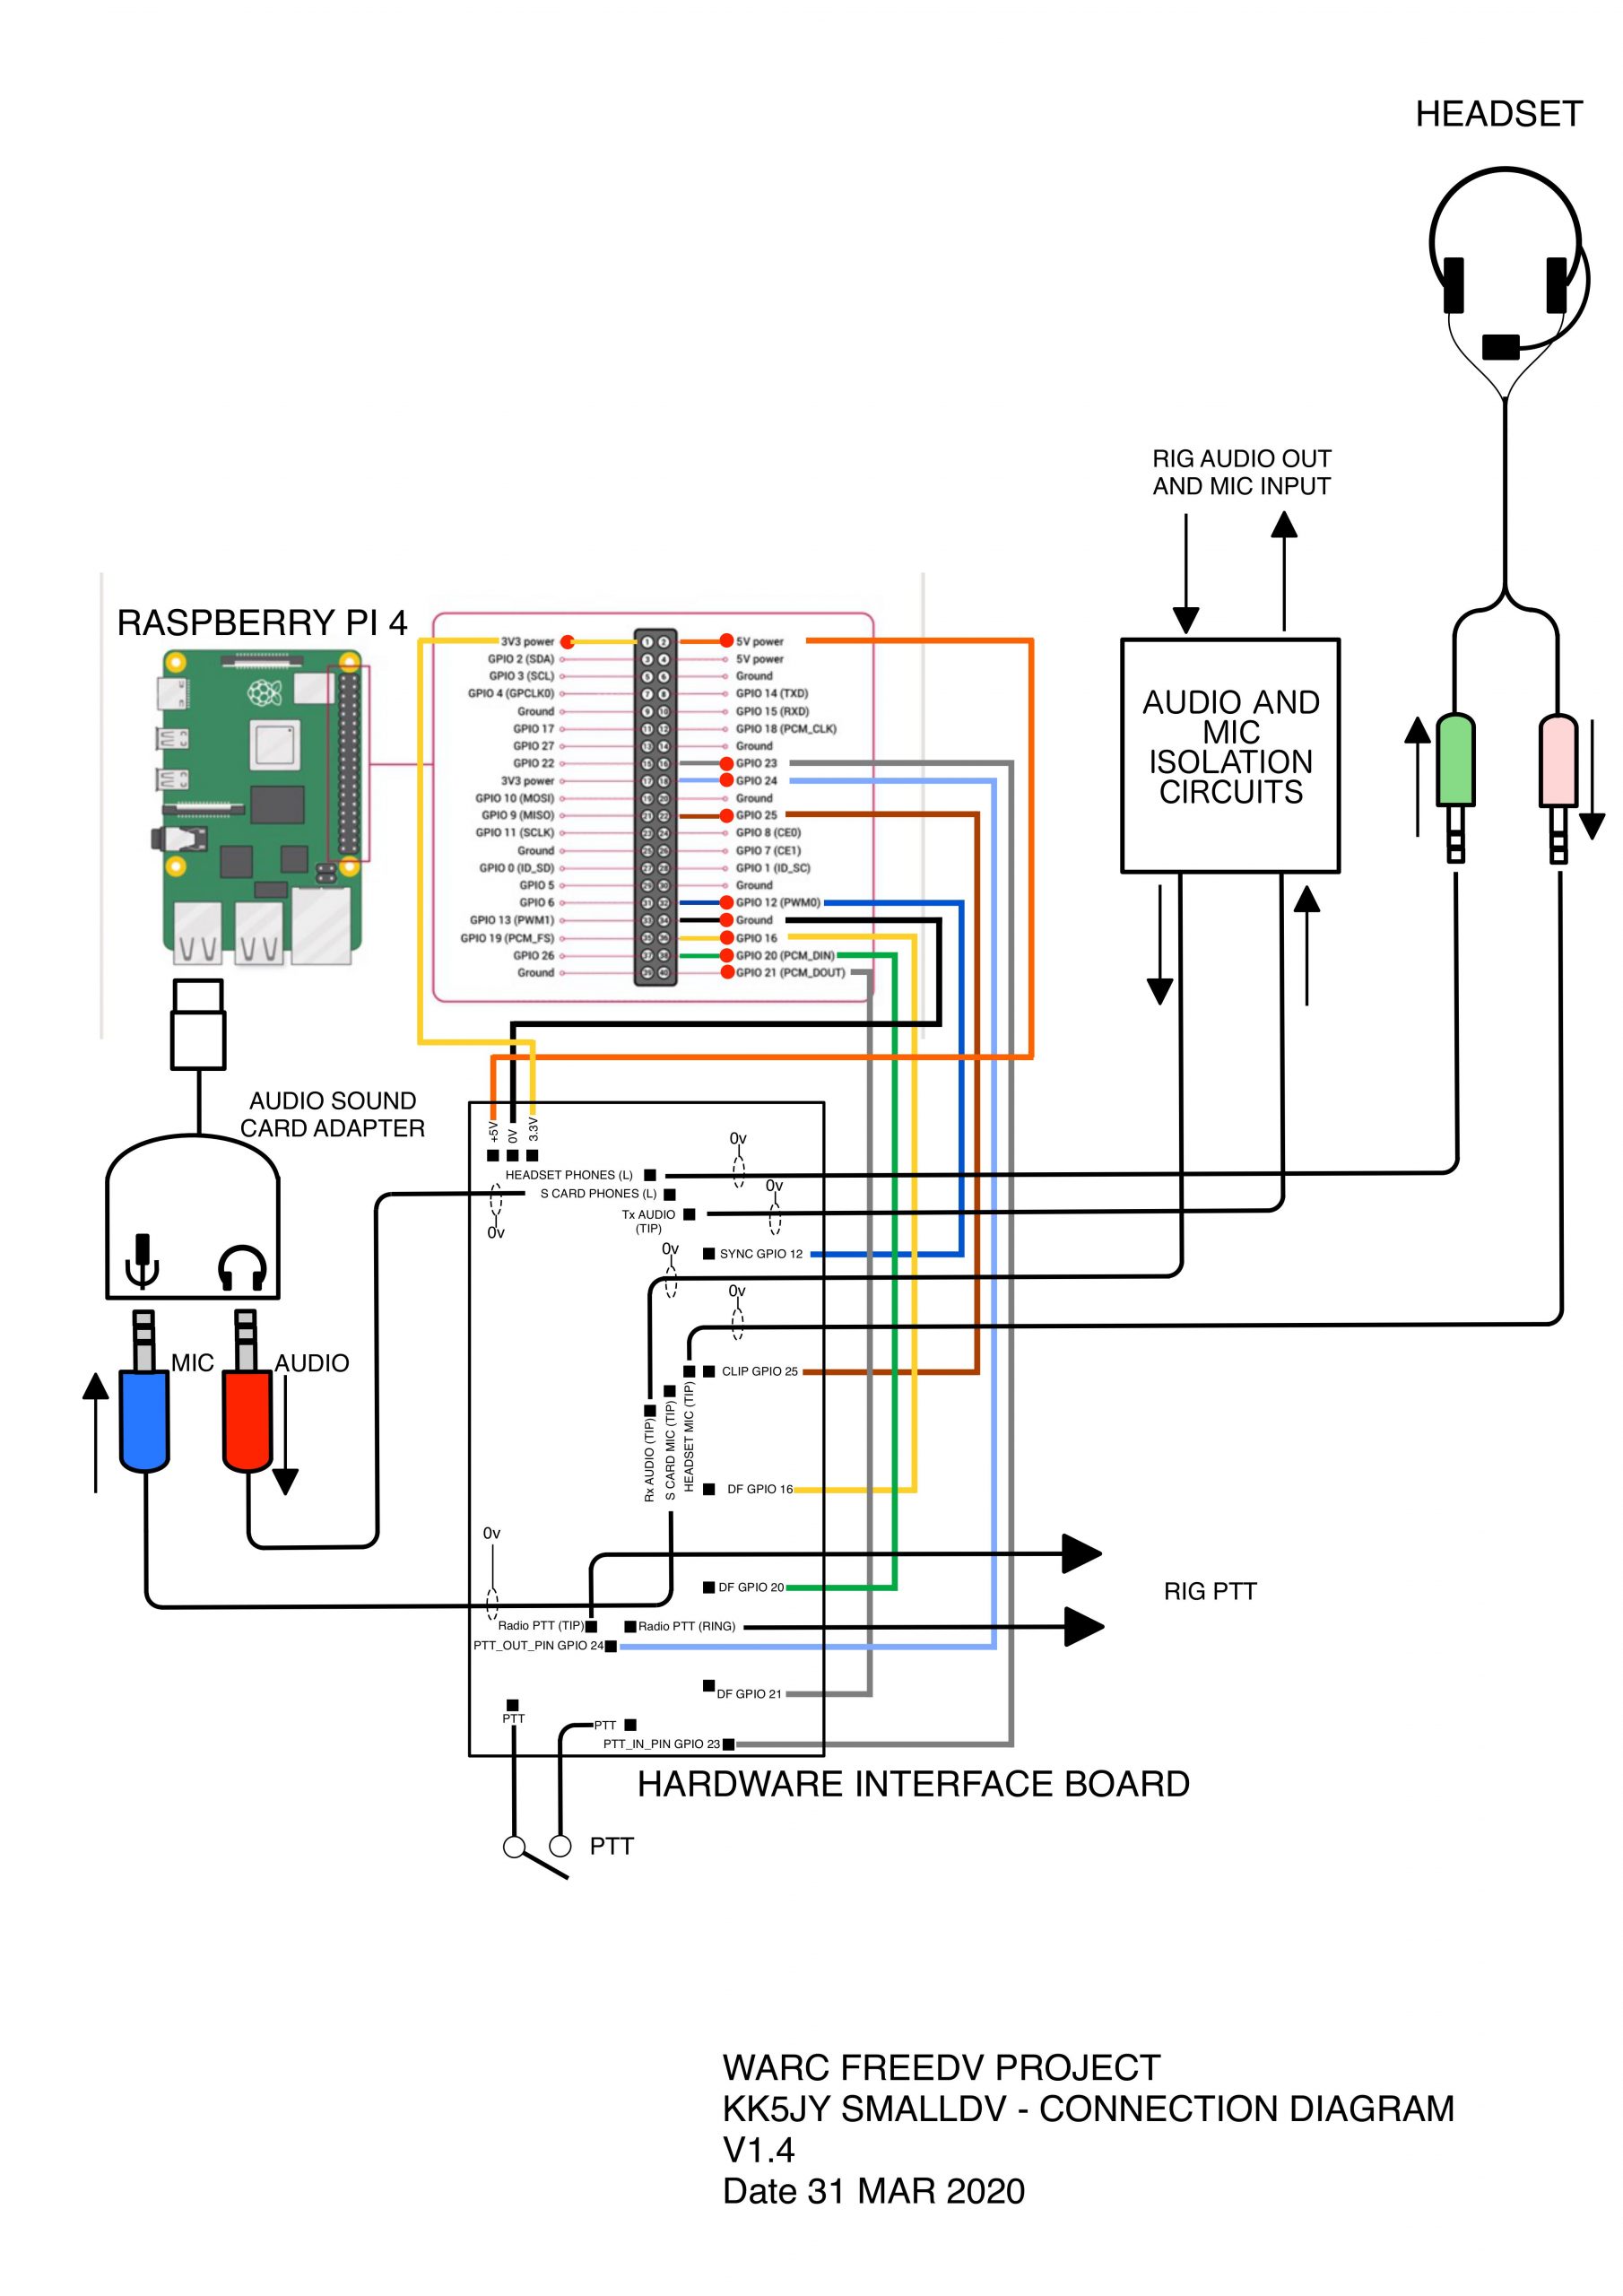
It’s based on 3 components:
- A Raspberry PI (preferebly a Pi 4)
- A cheap USB sound adapter
- A daughter board for the PI
This is how the components are connected.
The interface board schematic is as follows. The main part of the circuit is the audio switching. In order to avoid the need for two sound cards, a relay is used to switch transmit and receive audio. This is driven from the PTT output.
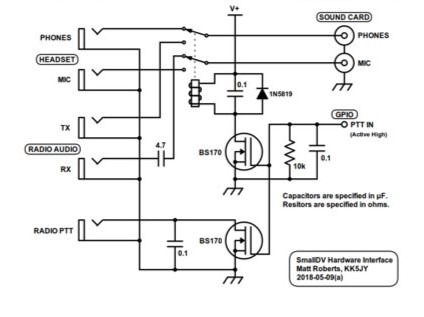
The PTT input is a debounced button.

These plus the status lights are implemented on a small PCB as shown.

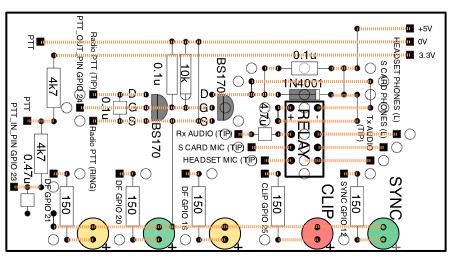
If you intend to build the board, here is a helpful aid.
Download this file and print it out. It contains scale layouts that can be placed over a piece of veroboard to assist assembly, together with the complete component list.
Software
Please note that the software may change. We are looking at implementing a switch interface to select the mode (rather than a tablet or computer). Also trying to get newer modes to work. Watch this space….
.. and no, 2020 runs on the PI4 but not properly (yet).
To install and run the software you need to do this. The basic outline is on the smallDV page but these are some extra notes.
First please note that the details that follow assume that you have the full desktop version of Raspbian installed. It is also recommended that following a fresh install you update it by executing ‘sudo apt update’ and ‘sudo apt upgrade’ then ‘sudo apt-get update’ and ‘sudo apt-get upgrade’ for good measure.
If you do not have the full version with the graphical interface, then don’t bother installing freedv, don’t install Spyder and use nano as the editor. Also don’t forget you can still have the graphical interface on another computer – from the Pi command line execute “vncserver” then use vncviewer from the other computer.
Also, if you are not using the full version there will be a few bits missing – such as git. To install that (for example) execute sudo apt-get install git’
- install (or update) using “sudo apt-get install” the packages:
- build-essential
- build-essential cmake
- libsndfile1
- libsndfile1-dev
- libasound2-dev
- get a copy of RtAudio and unpack into a folder called ‘rtaudio’ in your home directory (~/rtaudio). To get it, follow the link from the smalldv webpage which takes you here: https://www.music.mcgill.ca/~gary/rtaudio/.
Scroll down until you get to the latest release download and download it (at the time of writing that was version 5.1.0) . Don’t use git to get the files, you get the wrong set! - build RtAudio by following the instructions in the file ‘install.txt’. For version 5.1.0 this involves executing ‘./configure’ followed by ‘make’ from within the rtaudio folder.
- execute ‘sudo make install’ to install rtaudio
- get, make and install freedv by executing ‘sudo apt-get install freedv’. (This is really only needed if you want freedv as well as smalldv but I suggest doing it).
- Get a copy of codec2 and unzip it to a folder in your home directory called codec2. Either follow the link from the smalldv website, that takes you here ( https://github.com/drowe67/codec2 ) or simply change directory to home ‘cd ~’ and execute ‘git clone https://github.com/drowe67/codec2.git’
- The file ‘Install’ gives build details. For latest version this was:
- cd ~/codec2
- mkdir build_linux
- cd build_linux
- cmake ../
- make
- sudo make install
- install the python 2.7 version of Spyder (the python IDE) via “Add/Remove Software” . The reason for this is that smalldv is built using python2 and if you need to debug anything it’s rather useful 🙂 . To do this, open Add/remove software (it’s under ‘Preferencies’ from the desktop). Then select “programming” and wait whilst it updates. Enter Spyder in the search box and hit return. Click on “Python IDE for scientists (Python 2)” to select it (make sure Python 2 not 3) then click “OK”. You will be prompted for the account password. Enter it and click OK.
- get the smalldv package and unpack into a folder called ‘smalldv’ in your home folder (~/smalldv). Follow this link to get it. http://www.kk5jy.net/smalldv-v1/Software/ . Scroll down to the bottom of the page and make sure you get the latest version.
- cd ~/smalldv
- make smalldv by executing ‘make’. If you get an error telling you that FREEDV_MODE_700 and FREEDV_MODE_700B are not declared on lines 107 and 109 of fdvcore.cc, comment out lines 107,108,109,110 in fdvcore.cc and try again (or if you are going to upgrade to 2020 mode as shown below, you might as well make the changes indicated below at this time instead)
- install smalldv with ‘sudo make install’
- execute the command ‘fdvcore -l’
- you may get an error on no default device – this is probably because you have no default audio input or output device set (right click on the audio icon on the right of the toolbar at the top of the screen) and click on your input sound device to set it as default.
- from the response note the name of your audio adapter (probably sometling like “USB PnP Sound Device” or “USB Audio Device” ignore “hw:” and any number after the comma and the comma itself.
- right click on smalldv and open it with Spyder. Locate the entry for the PCMdevice and set it to that name. Save the file.
- execute smalldv. Note that because this is a Python 2 program do this by executing from the command line “python2.7 smalldv”.
- If you get an error message saying that __main__ could not be found, you are not in the smalldv folder !
- You should get a message telling you “DEBUG: Moving to background…”
- It should now be running (look at the LEDs on the interface board).
- To talk to the program, install Telnet (sudo apt-get install telnet) then execute “telnet 127.0.0.1 5445”. You can now give it commands as per the smalldv page. Note that when running it ought to create a smalldv.ini file in the .config folder and remember settings that you change
Ok, now for a 2020 mode version.
To build for 2020, codec2 needs upgrading. The instructions below are copied from here: https://github.com/drowe67/codec2
Note that the following assumes codec2 is in ~/codec2, which should be the case.
Build LPCNet:
$ cd ~
$ git clone https://github.com/drowe67/LPCNet
$ cd LPCNet && mkdir build_linux && cd build_linux
$ cmake -DCODEC2_BUILD_DIR=~/codec2/build_linux ../
$ make
$ sudo make install
Now rebuild codec2 with LPCNet support:
$ cd ~/codec2/build_linux && rm -Rf *
$ cmake -DLPCNET_BUILD_DIR=~/LPCNet/build_linux ..
$ make
$ sudo make install
Now you need a tweaked version of smalldv. Make the following changes. Note that line numbers relate to the ORIGINAL file line numbers. Easiest way is to locate the file with the graphical interface file manager, right click, and edit it with Geany.
First to fdvcore.cc
At line 27 change this:
#ifdef FREEDV_MODE_700D
#define FDV_MODES “1600, 800XA, 700, 700B, 700C, 700D”
#else
#define FDV_MODES “1600, 800XA, 700, 700B, 700C”
#endif
to this:
#ifdef FREEDV_MODE_2020
#define FDV_MODES “1600, 800XA, 700, 700B, 700C, 700D, 2020”
#else
#ifdef FREEDV_MODE_700D
#define FDV_MODES “1600, 800XA, 700, 700B, 700C, 700D”
#else
#define FDV_MODES “1600, 800XA, 700, 700B, 700C”
#endif
#endif
At line 106 change this:
if (!strcmp(argv[modemIndex],”700″))
modem = FREEDV_MODE_700;
if (!strcmp(argv[modemIndex],”700B”))
modem = FREEDV_MODE_700B;
to this:
#ifdef FREEDV_MODE_700
if (!strcmp(argv[modemIndex],”700″))
modem = FREEDV_MODE_700;
#endif
#ifdef FREEDV_MODE_700B
if (!strcmp(argv[modemIndex],”700B”))
modem = FREEDV_MODE_700B;
#endif
#ifdef FREEDV_MODE_2020
if (!strcmp(argv[modemIndex],”2020″))
modem = FREEDV_MODE_2020;
#endif
In smalldv:
At line 708 change this:
elif arg == ‘1600’ or arg == ‘700’ or arg == ‘700B’ or arg == ‘700C’ or arg == ‘700D’ or arg == ‘800XA’:
to this:
elif arg == ‘2020’ or arg == ‘1600’ or arg == ‘700’ or arg == ‘700B’ or arg == ‘700C’ or arg == ‘700D’ or arg == ‘800XA’:
At line 1117 change this:
if modem == ‘1600’ or modem == ‘700’ or modem == ‘700B’ or modem == ‘700C’ or modem == ‘700D’ or modem == ‘800XA’:
to this:
if modem == ‘2020’ or modem == ‘1600’ or modem == ‘700’ or modem == ‘700B’ or modem == ‘700C’ or modem == ‘700D’ or modem == ‘800XA’:
Now run ‘sudo ldconfig’ before you try to build or run smalldv or fdvcore.
Ok, now the new bit. smalldv as downloaded assumes that speech and modem run at 8000 bps. That’s not the case for modes like 2020 where speech is 16000 and moden 8000, so we need to change scdv.cc.
Download this version and replace scdv.cc by it. After this you should find 2020 TX works but receive will not yet – it takes too much CPU time. Work in progess. The coding should also support 2400 modes (and indeed these are present in codec2 as built above) but have not been tested. If you want to experiment, add 2400A and 2400B to fdvcore.cc and smalldv in the same way you added 2020 mode above.
Now rebuild smalldv (‘cd ~/smalldv’ then ‘make clean’ then ‘make’ and ‘sudo make install’)..
Autostart smalldv as a service
The next section details how to make smalldv autostart on bootup and how to start, stop and check status
Step 1 – create service unit
Open a smalldv service unit file using the command as shown below:
sudo nano /lib/systemd/system/smalldv.service
Add in the following text :
[Unit]
Description=SmallDV Startup Service
After=multi-user.target
[Service]
Type=idle
ExecStart=/usr/bin/python2 /home/pi/smalldv/smalldv -f
[Install]
WantedBy=multi-user.target
You should save the file and exit the nano editor (or hit control-x to exit, it will warn you and ask if you want to save the file, hit ‘y’ and then ‘return’ to use the existing filename).
This defines a new service called “SmallDV Startup Service” and we are requesting that it is launched once the multi-user environment is available. The “ExecStart” parameter is used to specify the command we want to run. The “Type” is set to “idle” to ensure that the ExecStart command is run only when everything else has loaded. Note that the paths are absolute and define the complete location of Python as well as the location of our Python script.
The permission on the unit file needs to be set to 644:
sudo chmod 644 /lib/systemd/system/smalldv.service
Step 2 – Configure systemd
Now the unit file has been defined we can tell systemd to start it during the boot sequence.
Execute these commands:
sudo systemctl daemon-reload
sudo systemctl enable smalldv.service
Reboot the Pi and your smalldv service should run:
sudo reboot
If smalldv stops and you want to restart it do this:
sudo systemctl start smalldv.service
Conversely to stop the smalldv service when it is running:
sudo systemctl stop smalldv.service
To see the status of the smalldv service:
sudo systemctl status smalldv.service
Note it will print a log of the usage of smalldv, for example changing modem.
If you want to remove the autostart:
sudo systemctl daemon-reload
sudo systemctl disable smalldv.service
Note:
It will log the changes to the status of the service – you can see the types of messages logged when you check the service status. These events are stored in the log files daemon.log and syslog. I don’t know how large these logs can get – there are automatic services that rotate logs to keep the size down – suggest initially you keep an eye on the log file sizes. Log rotation should be automatic – see /etc/logrotate.d/rsyslog. This should show that /var/log/syslog and daemon.log are part of automatic log rotation. Note the old log files in /var/log.